How-to: Upload an image to Wikimedia
Contributing an image to Wikimedia Commons
Wikimedia Commons stores all the image and other media files used by Wikipedia (& sister projects). This flowchart indicates some of the places you could check (or the tools you could use) to contribute an image to Wikimedia Commons.
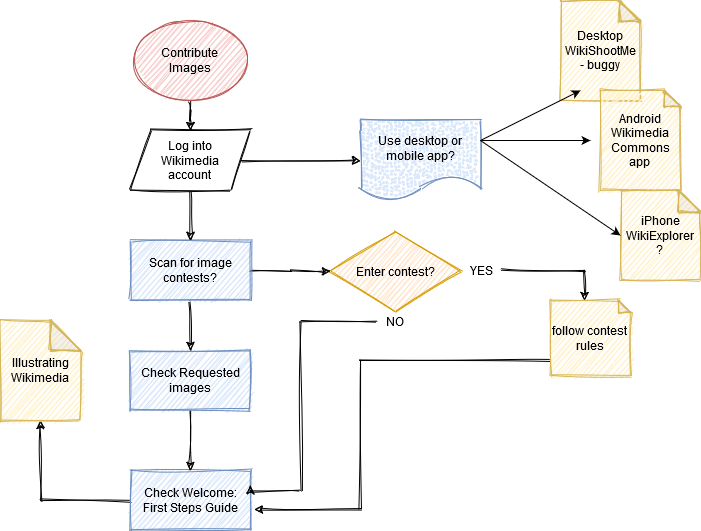
Remember to complete the First steps tour - a quick tutorial about contributing to Wikimedia and make sure that your image will meet the requirements and that you can provide the information needed to clarify the purpose/value of your image.
Once you have an image ready, you can upload from your computer or mobile device.
Upload an image (to your account)
First: log in to Wikimedia Commons. This is NOT the same as Wikipedia! Even if you just logged in to Wikipedia, you may have to log in again to Wikimedia Commons (you can use your same login credentials as you did for Wikipedia).
1. Find the Upload file link in the left column of your Main page (while logged into your account). You can also use the Upload button that appears on the right side of the page. This opens the Upload Wizard.
2. Review the infographic that asks you to confirm that your image meets requirements. (You can skip this step the next time you upload.)
3. Select the option "Select media files to share" or "Share images from Flickr". Select the image from your computer that you want to share and wait while it loads. Then press the Continue button that appears on the right.
Note: This method limits you to uploading one image at a time (suitable for beginners unless your are sure that all your images have educational value?) There are options for bulk uploads.
4. Confirm details of copyright licensing (is it your own work or the work of others. ) If you have questions, there is a direct link to help information or you can review FAQs.
5. Describe the image - give it a unique title, a caption (optional) and describe what makes it unique. Indicate the date the image was created or first published and then find the best category (most accurate?). You can also add the location and any more information you deem important.
Note: Members of the Wikimedia community stress the importance of selecting a category and adding a good description to ensure that your image is accepted and findable in the future. A list of existing categories is provided as your are sharing your image.
6. Final step: Select the Publish files button. The image will appear in your account.
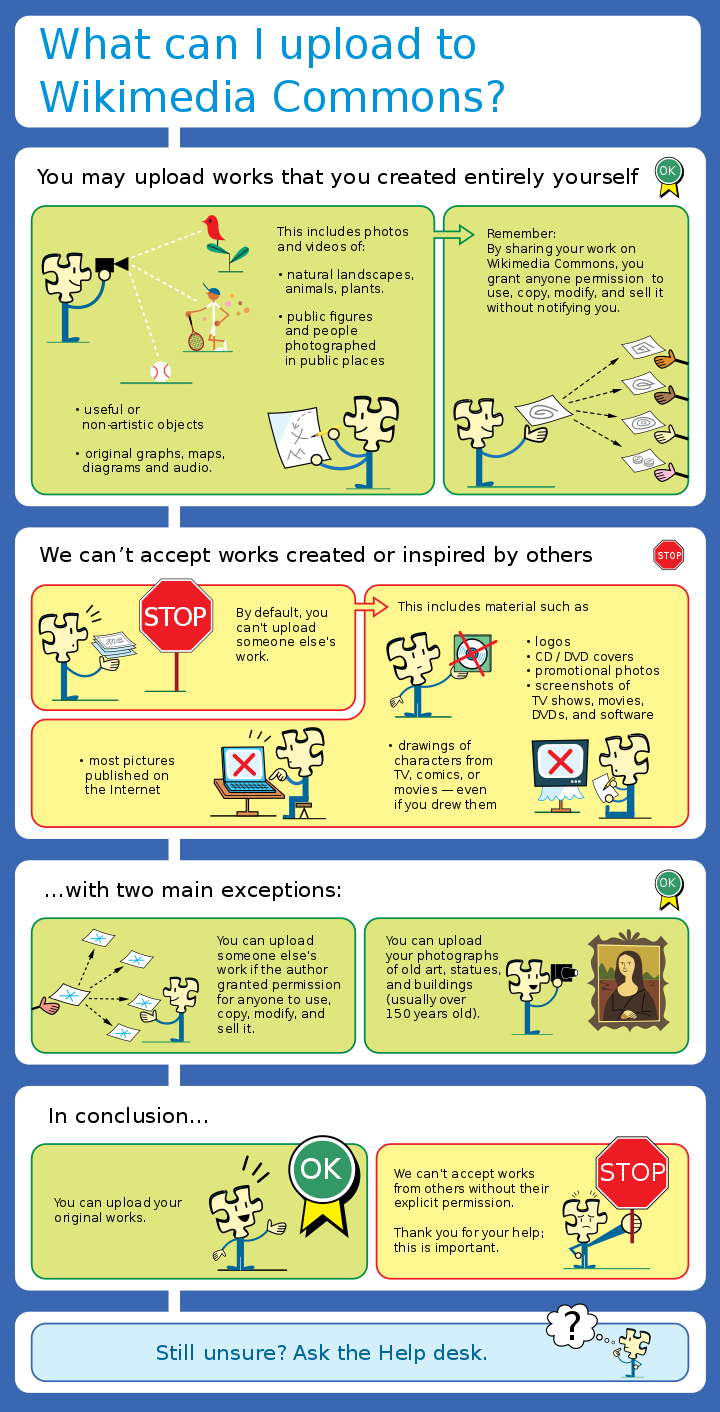
Note: You may find it handy to bookmark the location of Commons:Contributing your own work AND to keep a copy of the infographic: What can I upload to Wikimedia Commons?
- For a list of all the images being requested for Wikipedia, check here: Wikipedia requested photographs
- For a list of places in Canada which have an article in Wikipedia, but need an image, check here: Wikipedia requested photographs in Canada. Does your community need images??
Upload an image (from a mobile app)
Note: We have only tested the Android apps: WikiExplorer and Wikimedia Commons. Both worked for Gina. I found Wikimedia Commons worked well for me. Downloaded from Google Play. You can find out more about the features in this webguide.
If you have an iPhone or iPad (Location Services have to be enabled), you can find a version of WikiExplorer by Roman Alifanov in the App Store.
Basic steps to use Wikimedia Commons:
1. Download and install the app. You will be asked to give permissions to location and your camera.
2. Open the app. On the Home screen, tap on the tab NEARBY (you will be asked to allow the app to access your location).
3. Place a checkmark beside Needs Photo. The app will display a map showing your current location. You should see a number of location markers (dark blue with a red dot). If nothing appears, try zooming in or navigating slowly around your location until you find a marker.
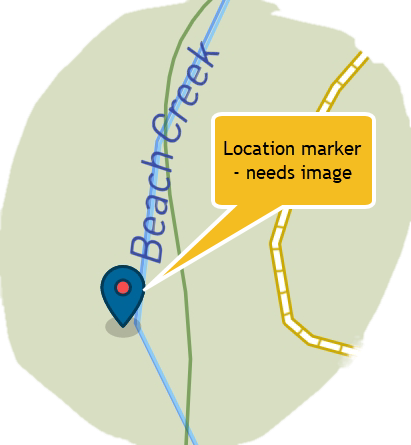 Note: The dark blue marker with a red dot indicates a point of interest that doesn't currently have a photo in Wikimedia Commons or Wikidata.
Two ways to capture and contribute a useful image (once you have found a local dark blue marker).
4a) Capture and Submit: If you have a way to connect directly to the internet while you are at the physical location, you can capture and submit your image in the field.
- Click on the point of interest (dark blue with red dot) marker - a name tag should pop up - look for a + (plus symbol) in the lower right corner. Tap on the plus symbol.
- Choose the option to take a picture. When you're happy with the result, click OK.
- Be prepared to provide some metadata: descriptive file name, select relevant categories, confirm license agreement (open license - CC-BY or CC-BY-SA usually).
- Complete the steps and your image will be uploaded to the Wikimedia Commons.
4b) Field Capture - Home Submission: If you prefer to submit your images from home:
- Use the app to find a nearby location(s). Then close the app and use your camera to take the image(s) you want. Try to capture images that illustrate something unique about the location.
- Return home and review the images.
- Open the app, refind the location and select the option to upload from your stored images. Then provide the metadata as requested. This allows you to use your internet connection and to do any additional research you may want to do that will clarify the value of your image.